本篇文章是用于解决最新版本electron在浏览器侧文件如何引入nodejs下的包的问题。主要基于The ultimate Electron guide 编写。
Chromium 和 Node 如何交互?
Electron 应用程序是一个npm项目,它包含electron框架作为依赖项。npm 项目的主要入口点是 Electron 应用程序的入口点,我们可以在其中选择性地包含我们想要的任何 Node API,以及创建并呈现UI的前端浏览器。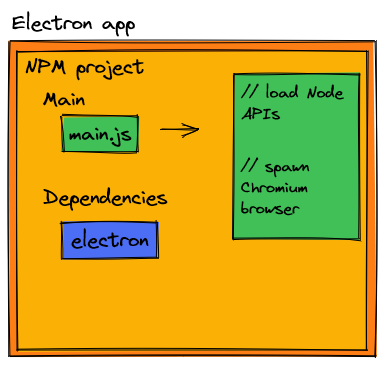
Chromium and Electron
Chromium 从它的主进程开始。从主进程中,可以生成**渲染器进程(renderer)**。渲染器进程与[browser]窗口同义。主进程持有对渲染器进程的引用,并可以根据需要创建/删除渲染器进程。在大多数 Electron 应用程序中,只会创建一个渲染器进程,但如果需要更多渲染器进程,则没有硬性限制。
渲染进程与主进程的关系如图。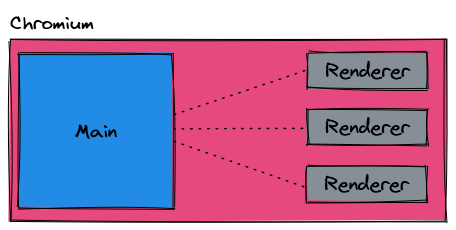
如若我们把渲染进程加入到之前的示意图中我们可以得到: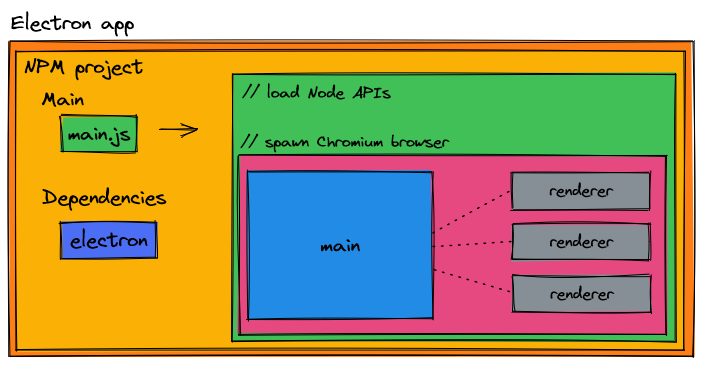
我们可以通过创建一个window并使用loadurl等方法创建一个render进程。
Node API in Electron
第五版electron之前
在老版本的Electron中,我们可以直接倒入Node。只要我们创建window的时候启用nodeIntegrarion=true。
// in main.js
function createWindow () {
  // Create the browser window.
  mainWindow = new BrowserWindow({
    width: 800,
    height: 600,
    webPreferences: {
      preload: path.join(__dirname, 'preload.js'),
      nodeIntegration:true //here
    }
此时我们的程序是可以随意require,访问node的。但是随之而来的就是很大的安全问题,如没有隔离等。
Electron 5+ and IPC
如果我们无法在渲染器中引入node API 那我们该怎么办呢? **IPC (inter-process communication)**is all you need! 事实上我们的主进程仅仅拥有renderer的引用,因此我们必须通过IPC进行通信。
IPC是基于事件进行通信的,实施IPC时,所有进程会监听事件,事件发生时则会进行执行。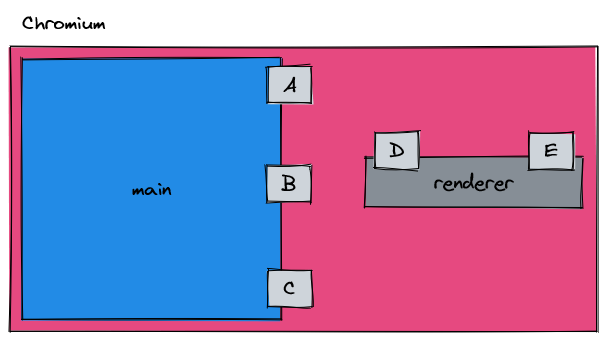
// code in main
const {
  app,
  BrowserWindow,
  ipcMain
} = require("electron");
const path = require("path");

// Keep a global reference of the window object, if you don't, the window will
// be closed automatically when the JavaScript object is garbage collected.
let win;

async function createWindow() {

  // Create the browser window.
  win = new BrowserWindow({
    width: 800,
    height: 600
  });

  // Load app
  win.loadFile(path.join(__dirname, "dist/index.html"));

  // rest of code..
}

app.on("ready", createWindow);

// Create an listener for the event "A"
ipcMain.on("A", (event, args) => {

  // Send result back to renderer process
  win.webContents.send("D", {success: true});
});
// code in renderer
const {
    ipcRenderer
} = require("electron");

window.sendToA = function(){
    ipcRenderer.send("A");
};

window.receiveFromD = function(func){
    ipcRenderer.on("D", (event, ...args) => func(event, ...args));
};
然而这只是示例,我们并不能在renderer.js 中直接require("electron")
Preload and security
我特意忽略了在主进程和渲染进程之间通过 IPC 进行通信时所需的重要细节,这就是 Electron 团队定义为预加载脚本的内容。
由于我们的渲染器进程无法访问 Node,因此它们自己无法创建所需的 IPC 绑定!这个问题的答案是通过预加载脚本(preload.js),它可以访问 Node API。我们在预加载脚本中创建渲染器 IPC 绑定;预加载脚本的内容被注入到我们的渲染器进程中.
我们可以在创建window的时候导入preload。
// Create the browser window.
win = new BrowserWindow({
  width: 800,
  height: 600,
  webPreferences: {
    preload: path.join(__dirname, "preload.js")
  }
});
但是事实上直接使用preload意味着我们全权信任渲染端,也就是服务器端,这很容易造成安全问题。
后面的一段代码将提供一个示例,说明这样使用preload有怎么样的问题。
// preload.js
const {
    ipcRenderer
} = require("electron");

window.send = function(){
    return ipcRenderer.send;
};

window.receive = function(){
    return ipcRenderer.on;
};
<!-- code in index.html -->
<!doctype html>
<html lang="en-US">
<head>
    <meta charset="utf-8"/>
    <title>Title</title>
</head>
<body>
    <script>
        // Called when message received from main process
        window.receive()("fromMain", (data) => {
            console.log(`Received ${data} from main process`);
        });

        // Send a message to the main process
        window.send()("toMain", "some data");
    </script>
</body>
</html>
// code in main.js
const {
  app,
  BrowserWindow,
  ipcMain
} = require("electron");
const path = require("path");
const fs = require("fs");

// Keep a global reference of the window object, if you don't, the window will
// be closed automatically when the JavaScript object is garbage collected.
let win;

async function createWindow() {

  // Create the browser window.
  win = new BrowserWindow({
    width: 800,
    height: 600,
    webPreferences: {
      preload: path.join(__dirname, "preload.js") // use a preload script
    }
  });

  // Load app
  win.loadFile(path.join(__dirname, "dist/index.html"));

  // rest of code..
}

app.on("ready", createWindow);

// Create a listener for deleting files
ipcMain.on("deleteFile", (event, args) => {
  fs.unlinkSync(args.filePath);

  // Send the result back to the renderer process
  win.webContents.send("deleteFileResponse", true);
});
如果我们错误地信任我们的渲染器进程,并且我们的代码前端被黑客攻击以将文件路径列表发送到“deleteFile”通道,我们可能会丢失计算机上的重要文件。这可能是一个人为的例子,但它表明如果我们不小心,有人可能会利用我们的代码来执行我们不希望的操作。
为了使用 IPC而不会受到函数覆盖的影响,我们需要使用上下文隔离(context isolation)。简而言之,上下文隔离创建了一个您在预加载中定义的不可变对象。渲染器进程无法更改任何具有上下文隔离的内容。幸运的是,设置上下文隔离非常容易。
Preload with context isolation
btw,从Electron版本 12开始,值contextIsolation默认为 true。
我们在引入windows时使用的代码应该设置contextisolation值.
// Create the browser window.
// code in main.js
win = new BrowserWindow({
  width: 800,
  height: 600,
  webPreferences: {
    contextIsolation: true,
    preload: path.join(__dirname, "preload.js")
  }
});
我们的预加载需要稍微改变以支持上下文隔离;我们需要使用electron中的contextBridge.
// code in preload.js
const {
    ipcRenderer,
    contextBridge
} = require("electron");

// Expose protected methods off of window (ie.
// window.api.sendToA) in order to use ipcRenderer
// without exposing the entire object
contextBridge.exposeInMainWorld("api", {
    sendToA: function(){
        ipcRenderer.send("A");
    },
    receiveFromD: function(func)